
Creating CNAMEs on a Pi-Hole
During these odd times when we are forced to stay at home, I’m taking the opportunity to reorganize my home network a bit.
I recently got myself a RockPro64, a single board computer similar to a RaspberryPI, but with more computing power and a PCI express slot that makes it excellent as a home NAS.
I moved all the docker containers that I usually run on my desktop computer to the RockPro64, using Traefik 2 as ingress to send the traffic to the proper containers, initially using the path (example: rockpro64.local/firefly sends the traffic to the Firefly III instance).
I quickly discovered that most containers don’t like path routing, and try to play with Traefik paths to redirect traffic while stripping the path didn’t help much. So I was looking for a way to use subdomains in order to route traffic, which would always expose containers on the root path of a domain, and solving all the issues I was having.
I run a PiHole in my home network, that does the DNS lookups for all the clients in the network (and filters ads and malicious domains while doing that, you should definitely get it if you don’t use it already), in addition to that I also use the PiHole as DHCP server for the network (just because the UI was nicer that most of the routers I’ve had so far).
The PiHole assignes a domain name to each of the clients in the form <clientname>.local, so using it to create my domains seemed like the logical choice, but there is no option to do that on the UI.
Looking at the documentation about the PiHole, I found out that it uses dnsmasq under the hood to cache dns entries. Bingo!
Dnsmasq can be configured with additional domains, just go to the directory containing the service configuration files (usually /etc/dnsmasq), create a new configuration file (they all are in the form NN-name.conf, where NN is a double digit number, so they load in order, I named mine 50-cnames.conf) and you can place the CNAMES in the file with this syntax
cname=subdomain1.clientnanme.local,clientnanme.local
cname=subdomain2.clientnanme.local,clientnanme.local
This creates two subdomains for clientname.local. As CNAMEs, the two subdomains created will resolve to the exactly the same IP as clientname.local, that’s what we need.
Last step after editing the file is issue a pihole restartdns command to make sure that PiHole reads the new configuration.
Just for completeness, while this configuration works well for my needs, it has a weakness: the name of the target domain is hardcoded, so if the target client names changes, the dnsmasq configuration will require the same change, or else the cnames will point to an unexisting domain.
»Adding Let's Encrypt SSL certificates to nginx websites on Ubuntu
Let’s Encrypt is a certificate authority that is providing free SSL certificates. The process to acquire certificates is fully automated and is designed to make the creation and renewal of certificates as painless as possible.
This short post will describe the steps to get and configure certificates for a website hosted on ubuntu using nginx as webserver.
The first step is install the certbot tool. Ubuntu provides packages so the installation can be done with a simple
$ sudo apt-get install letsencryptThe next step is to generate the certificate using certbot, the process creates some files in the root directory of the website, so access to the folder is required. Launching certbot with this command line does the trick
$ sudo letsencrypt certonly --webroot -w /var/www/munisso.com -d munisso.comThe command will generate the verification files in the specified folder and will look for them using the domain to be certified. If the verification process is successful, the certificates will be created in /etc/letsenctypt/munisso.com/
After creating the certificate we need to configure nginx to serve the website using SSL along with the unencrypted HTTP version. To do so we need to edit the nginx configuration file for the website (for example /etc/nginx/sites-available/munisso.com) and add the following configuration options
listen 443 ssl;
listen [::]:443 ssl;

ssl on;

ssl_certificate /etc/letsencrypt/live/munisso.com/fullchain.pem;
ssl_certificate_key /etc/letsencrypt/live/munisso.com/privkey.pem;

ssl_stapling on;
ssl_stapling_verify on;
ssl_trusted_certificate /etc/letsencrypt/live/munisso.com/chain.pem;
Make sure to replace the domain name with the appropriate folder for your website. Restarting nginx or reloading the configuration will enable SSL on the website.
»Using SSH with git and Github in Windows
Is handy to use SSH while connecting to git, for better security and the advantage of not having to type passwords at every remote operations.
Here the instruction on how to set it up for Windows:
Generate the ssh key
- using the command prompt, go to
%Git folder%\bin(usuallyC:\Program Files (x86)\Git\binorC:\Program Files\Git\bin) - generate the key pair using
ssh-keygen, leave the key name as default
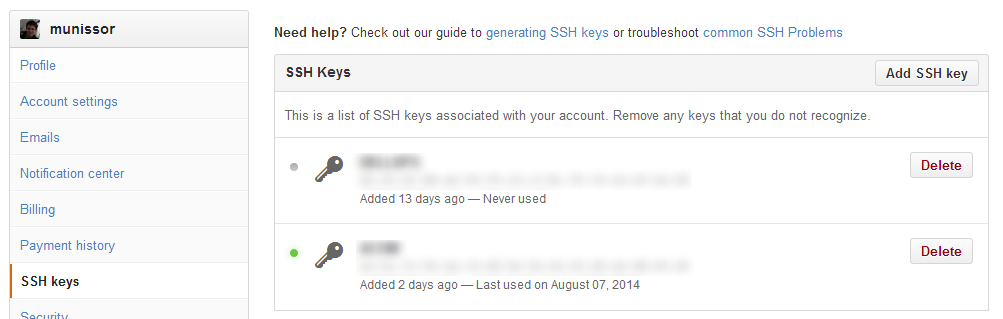
Upload the key to github
- Go to
%USERPROFILE%\.ssh - open the file
id_ssh.puband copy the content - go to your account in github, and under the SSH Keys tab, enter a new key. Paste your public key and give it a friendly name
Set up ssh for git
- Copy the path of the
ssh.exeexecutable under your\binfolder - Create a new environment variable called
GIT_SSHand set it to the path of thessh.exe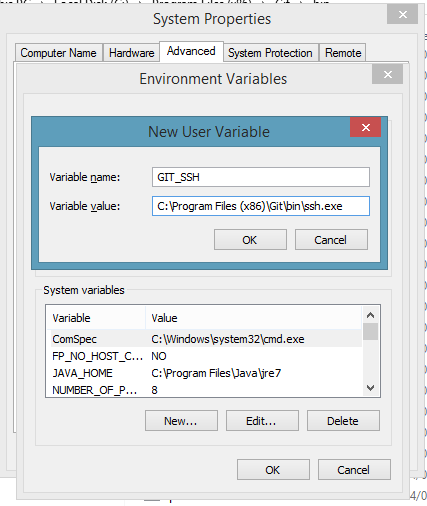
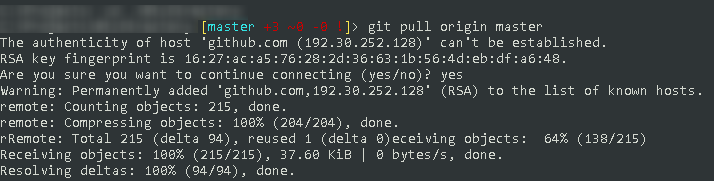
Clone
- Now just clone your repository using the SSH link, rather than the http(s) ones.
- If everything was setup correctly you shouldn’t be requested a username or password.
- The first time you clone, SSH will ask you to confirm the ssh fingerprint of the remote server
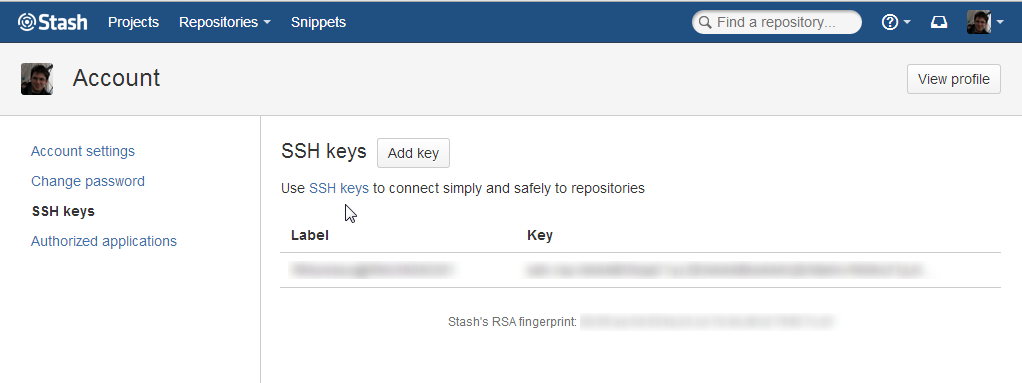
Tip
Other git hosts have support for SSH. If you use Stash for example, just copy and paste your id_ssh.pub content into a new SSH key under your account preferences.
4 ways to get identity IDs of inserted rows in SQL Server
In this post I’ll explain the 4 methods available to get the IDs of newly inserted rows when the table has an identity Id column.
@@IDENTITY
This variable contains the last identity value generated by the current connection, is not limited to the scope of the code being executed. In case the current connection didn’t insert any row with an identity the property will have a NULL value.
INSERT INTO TableA (...) VALUES (...)
SET @LASTID = @@IDENTITY
This code will give you unexpected result if there is a trigger, running for inserts in TableA, that is inserting row in other tables with an identity. In this case the @@IDENTITY variable will give you the ID inserted by the trigger, not the one inserted in the current scope.
2) SCOPE_IDENTITY()
This function will return the value of the last identity inserted in the current executing batch.
The following code
INSERT INTO TableA (...) VALUES (...)
SET @LASTID = SCOPE_IDENTITY()
will return the last value inserted in TableA by our insert, even if other connections, or trigger fired by the current connection are inserting values with IDs.
This will be the best method to use in most of the cases.
3) IDENT_CURRENT(‘table’)
This function returns the last identity value inserted in the specified table, regardless of the scope and connection.
SET @LASTID = IDENT_CURRENT('dbo.TableA')This function is available in SQL Server 2005 and newer versions.
4) OUTPUT
The output clause can be used to get IDs when inserting multiple rows.
DECLARE @NewIds TABLE(ID INT, ...)

INSERT INTO TableA (...)
OUTPUT Inserted.ID, ... INTO @NewIds
SELECT ...
This obviously will insert into @NewIds the Ids generated by the current statement. Other connection or code executing in different scopes will not affect the result of the operation.
Like IDENT_CURRENT, also this function is available in SQL Server 2005 and newer versions.
How to add your own code snippets in Visual Studio
Visual Studio (starting from version 2005) gives you the possibility to use the code snippets to insert frequently used code parts quickly using an alias. Try for example to digit “prop” and press TAB to create a full property. The type and the name of the property are parameters of the snippets, they have a default value that can be changed.
Visual studio has a long list of pre-made code snippets available, but obviously not every option that we might need is available. In this post I want to show you how to create your own code snippets.
One task that I perform very often is to check method arguments against null values, in every public method I repeat this piece of code for each parameter.
if( arg == null )
   throw new ArgumentNullException("arg");
Let’s create a code snippet, that I will call “checknullargs”, to automate the creation of this code.
First of all we have to create a new file called “checknullargs.snippet” (you don’t have to call the file in with the same name as the alias, but I recommend to do so, it will be quicker to identify which file contains a specific snippet if you will need to edit or delete them) in the folder %Documents%\Visual Studio %Version%\Code Snippets\%Language%\My Code Snippets, where %Documents% is your Documents folder, %Version% is the visual studio version that you have installed (eg. 2005, 2008, 2010) and %Language% is the programming language that you want to use to write the snippet (and the snippet will be available only for that language).
The code snippet file is a simple XML file with the following structure.
<?xml version="1.0" encoding="utf-8"?>
<CodeSnippets xmlns="http://schemas.microsoft.com/VisualStudio/2005/CodeSnippet">
	<CodeSnippet Format="1.0.0">
		<Header>
			<!-- Descriptive information here -->
		</Header>
		<Snippet>
			<!-- Code information here -->
		</Snippet>
	</CodeSnippet>
</CodeSnippets>
The file can be opened in visual studio to get full intellisense support.
Inside the Header element let’s add information about our snippet
<Title>checknullarg</Title>
<Shortcut>checknullarg</Shortcut>
<Description>Checks for null arguments</Description>
<Author>Riccardo Munisso</Author>
<SnippetTypes>
	<SnippetType>Expansion</SnippetType>
</SnippetTypes>- Title: is the name of the snippet
- Shortcut: is the shortcut that we use inside of visual studio to activate the snippet
- Description: description of your snippet
- Author: your name!
- SnippetTypes / SnippetType: is the type of snippet, can be
ExpansionorSurroundsWith. AnExpansionsnippet just add code to the editor, aSurroundsWithsnippet surrounds the selected code with the content of the snippet.
Let’s fill now the Snippet section. The snippet section is divided in two parts, a Declarations element that allows us to declare the parameters (the replaceable parts) of our snippets, and the Code element containing the actual code.
<Declarations>
	<Literal>
		<ID>arg</ID>
		<ToolTip>Argument to be checked</ToolTip>
		<Default>arg</Default>
	</Literal>
</Declarations>
<Code Language="csharp"><![CDATA[if ($arg$ == null)
throw new ArgumentNullException("$arg$");
$end$]]>
</Code>
The Declarations element contains a list of Literal elements, one for each parameters of the snippet. For each parameter we have to specify the ID (that needs to be unique), a tooltip and the default value.
The Code element contains the actual code to be inserted. You can insert your parameter using sourrounding them with dollar symbols (in this example $arg$).
Note that in the above sample there is a parameter called $end$ that we didn’t declare. This is a predefined value that represents the position of the cursor after the snippet is inserted in the editor. In this case the cursor will be placed after the snippet.
There is also another predefined parameter, called $selected$ that represents the code selected in Visual studio when adding the snippet. This is useful for the SurroundsWith type of snippets.
Once you have created your snippet you will need to restart visual studio for see the changes in the editor.
The full code for the sample snippet can be downloaded here
Happy coding!
»